
How to Detect Leaks in Rural Networks Without SCADA
If you manage water supply in a rural area, you’re familiar with the typical “game”: everything seems fine… until a strange bill shows up, a reservoir drops too quickly, or someone calls because there’s no water pressure.
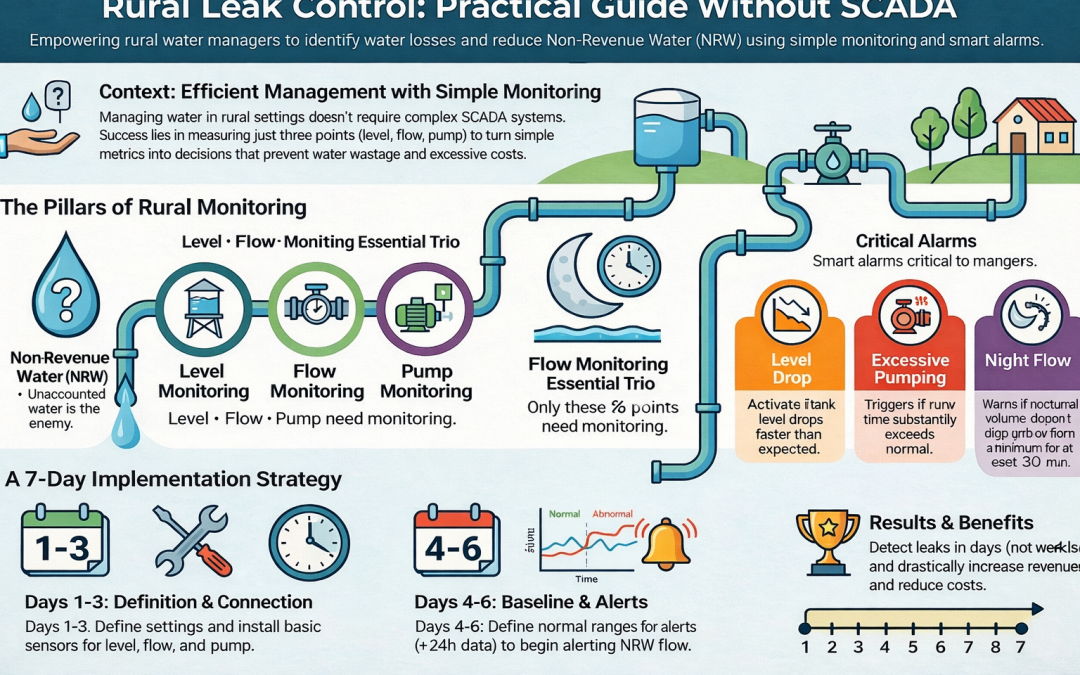
The good news: you don’t need a massive SCADA system to start detecting leaks. What you need is to measure 3–5 meaningful parameters, set up useful alarms, and stop playing “where’s the leak?” by eye.
1) The enemy: unaccounted-for water (ANR)
ANR is the water you produce or purchase but do not bill for. It can come from:
-
Leaks (the real ones—the ones that drain your tanks)
-
Metering errors (old, improperly installed, or non-remote-read meters)
-
Unmonitored consumption (irrigation, outdoor faucets, municipal uses “without a receipt”)
-
Overflowing tanks or valves left open
Your goal isn’t just to “have data.” It’s simpler than that: reduce ANR and act sooner.
2) The minimum you should measure (to get off to a good start)
Forget about installing sensors just for the sake of it. When it comes to detecting leaks, this puts you in the big leagues:
A) Deposit level (or deposits)
It shows you the system’s status.
- If it drops more than usual and there’s no expected usage → be suspicious.
- If it rises and overflows → direct waste.
B) Flow rate/master meter (inlet or outlet)
It gives you the full picture:
- How much comes in / how much goes out
- Trends by hour/day
- Nighttime spending (the most reliable indicator)
C) Pump status (on/off) + energy consumption (if possible)
Because many leaks are detected as a side effect:
- The pump starts up more often
- The pump runs longer
- Energy consumption goes up, and no one understands why
With level + flow + pumping, you can set up a pretty decent leak detection system without needing a “high-tech SCADA system.”

3) Simple metrics that work (and don’t require magic)
Here are 5 metrics that are easy to calculate and highly effective:
1) Minimum nighttime consumption
Define a time period (for example, 2:00–5:00 a.m.).
If the flow rate never drops below X during that time period, there is a constant flow.
Constant flow + no one using water = a leak or an open valve.
2) Tank drainage rate
Calculate: cm/h or %/h.
If the tank empties faster than usual, trigger an alarm.
3) Abnormal fill time
If it takes much longer to restore the water level (with the same pump), something is wrong:
- Leak downstream
- Leak in the pipeline
- Valve open
- Problem with the discharge
4) Pumping cycles per day
More cycles = more stress = higher costs.
If you go from 10 cycles a day to 25 without any explanation, it’s not just “bad luck.”
5) Input/output balance (when you have two meters)
When you compare:
The tank outlet meter vs. the total consumption/sectors (if applicable)
Or the grid inlet meter vs. billed consumption
…the ANR appears as if you’d turned on a light.

4) Useful alarms (the ones that really should be there)
Most systems fail for the same reason: poorly designed alarms. The result: noise, and people stop paying attention.
These alarms are often “gold”:
Rapid level drop
“If it drops > X% in Y hours (during a time period with no expected consumption).”
Sustained nighttime consumption
“If the flow rate does not drop below X for more than Z minutes.”
Pump running too much
“If total daily ON time exceeds the average + threshold.”
Overflow / maximum level
“If level reaches maximum and continues to rise or does not drop.”
No communication / sensor failure
Because a system that doesn’t warn you when it goes blind… is just decoration.

5) A 7-day method to start detecting leaks
Days 1–2: Identify patterns
-
When does actual consumption occur? (times)
-
How much variation is normal?
-
Which reservoirs/areas are most critical?
Day 3: Install and connect data
-
Level + meter/flow + pumping (if applicable)
-
View real-time and historical data
Days 4–5: Establish a “baseline”
-
Just 48 hours of data is enough to identify useful patterns
-
Track your minimum nighttime consumption
Day 6: Set two alarms
Just 2 at the start (yes, just 2):
-
Sustained nighttime consumption
-
Rapid level drop
Day 7: Review and adjustment
-
Does the alarm go off when it’s supposed to?
-
Is it giving false alarms?
-
Fine-tune it and you’re all set

6) What results can you expect?
Depende del estado de la red, pero lo habitual cuando pasas de “visitas” a “telemetría” es:
✔️ fugas antes (horas/días, no semanas).
✔️ Menos desplazamientos “a ciegas”.
✔️ Menos reboses.
✔️ Mejor planificación de mantenimiento.
✔️ Evidencias para justificar inversiones (y subvenciones).
Y el mayor «beneficio oculto»: dejas de discutir con sensaciones. Empiezas a decidir con datos.

Minimum Nightly Consumption (MNC)
¿Quieres saber como trabajamos?
-
Si gestionas un abastecimiento y quieres reducir agua no registrada sin montar un SCADA enorme, podemos ayudarte a implantar CMN con telemetría y alarmas en pocos días.
👉 Pide una demo, y lo aterrizamos con tus depósitos/contadores y tu realidad (que es la única que importa).
Can a leak be detected just by checking the tank level?
You might suspect it, but the best approach is to combine the level reading with the flow rate or meter reading to confirm and quantify it.
Which is better for rural networks: LoRaWAN or NB-IoT?
It depends on coverage, cost, and architecture. The important thing is that the system is robust, with a history log and alerts (and that it doesn’t force you to commit to a long-term contract).
What is the minimum data I need to reduce ANR?
Tank level, a representative meter/flowmeter, and, if there is a pump, the pump status. With that, you’re all set to get started.
How often should sensors be calibrated?
It depends on the type (level, chlorine, pH, etc.), but the correct approach is: monitor conditions + trigger alarms for deviations and plan preventive maintenance.